How do you delete photos from Google Photos?

Seems a pretty easy question to ask. Should be a relatively easy question to answer. Wrong! It’s a minefield of complication and you can quite easily find yourself deleting images from places you don’t want them to be deleted from. In this article I’m not going to even attempt to enter the minefield but after this easy one …

How do you delete photos from Google Photos on the web but not from the Camera Roll on your iOS (iPhone/iPad) device …

Google Photos will only delete photos from your Camera Roll if you grant it permission to do so.  If you delete from https://photos.google.com/ and then go to your phone app you will have an assistant card asking for permission to “Remove it from this device”  If you dismiss the card the photo will remain in the Camera Roll.

… I’m just going to refer you to these three articles …

First the generic article that covers all eventualities and takes into account the place of  Backup and Sync in the process for the Android world

How to delete Photos from Google Photos but Not from Phone

note the important piece of text in this article …

“While keeping a file on Google Photos and deleting it from a device is easy, it’s not simple to do so the other way round. When you delete a synced photo from the Google Photos app, it gets wiped from your phone and the cloud storage.”

… so take care and read what follows in that article.

For the iOS (iPhone/iPad) world

How to Delete photos from iPhone but Not from Google Photos

… so heaven help you if you’ve got both Android and iOS devices; the process is not the same for both!

Lastly, and to fully understand what’s going on, it’s important to perhaps try to understand how Google Photos actually works. You can do this by reading this article …

What happens when you Delete photos from Google Photos.

… if that hasn’t made you feel suicidal, can I just wish you the best of luck. Perhaps buying a new phone, or taking out a Google One subscription is the only answer.

Could that be the reason why it’s so complicated to delete a Photo from Google Photos?

====

You might also find these articles from Google useful. Firstly an introduction to Backup and Sync and how it works with photos and videos (hint, it doesn’t actually do any sync’ing) …

Back up photos and videos

… then, a guide to help you work out what size of image/video you might want to backup and sync (or upload) to Google Photos on the web …

Choose the upload size of your photos and videos

… you perhaps need to refer to this post to see why this might be important.


You, groups, flickr and privacy

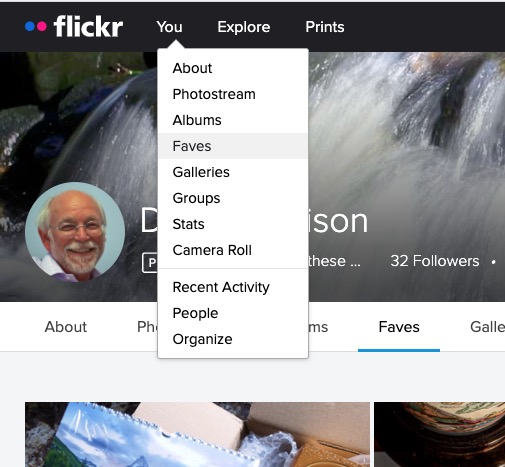
Most of the time people join flickr to showcase their photos, to get faves, and to get comments (hopefully both positive and constructive) to enable them to improve their photography. The photos you upload are shown in your flickr Photostream (or Camera Roll) which you can browse and put into Albums. You can create your own Galleries of your (and other people’s) images; Fave images that appear in your Activity stream (see later) and Follow people whose photos you like.

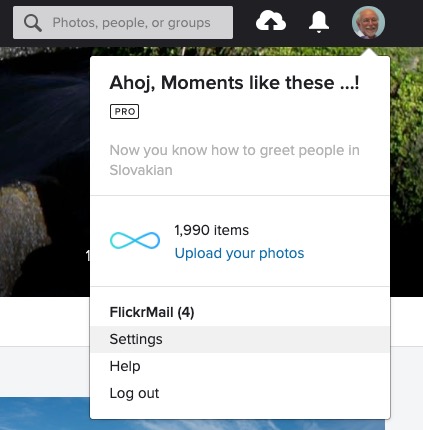
We’ll start by looking at the default privacy settings you can apply to the images you upload. The Settings page is accessed from your profile tab …

… which gives you access to a page with these headings …

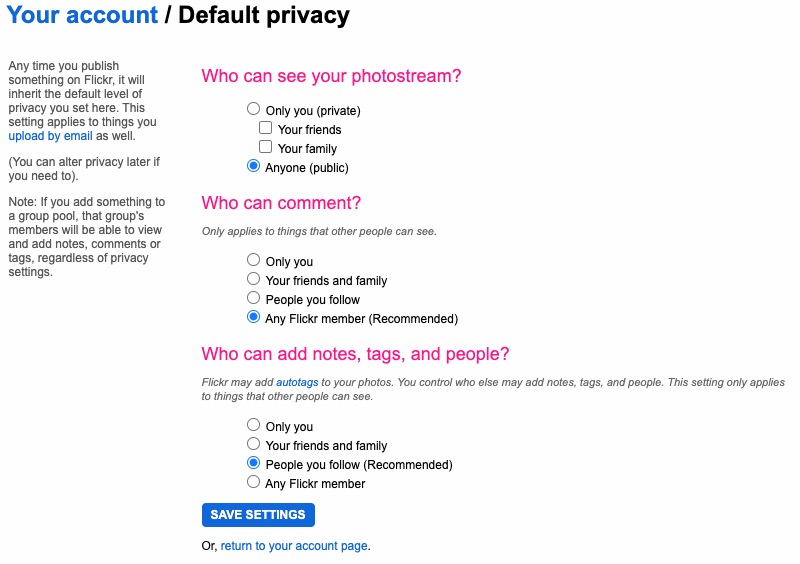
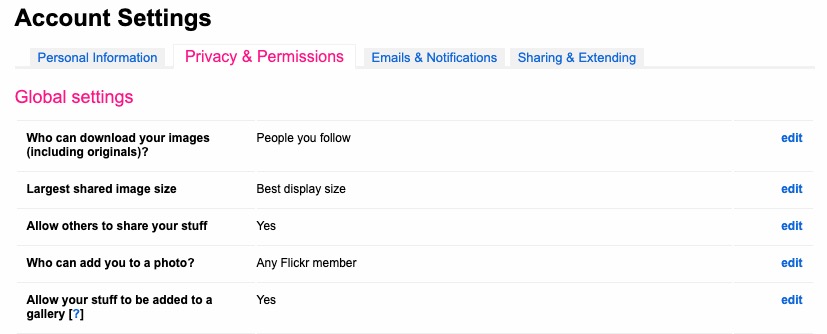
… clicking on Privacy and Permissions brings up this screen – from which you should first look at Defaults for new uploads

Read carefully the Note: “if you add something to a group pool, that group’s members will be able to view and add notes, comments or tags, regardless of privacy settings.” There’s no privacy within a group. All members of the group can see all members’ photos. If you’ve declared your image to have restricted viewing to Friends, or Family however they will not be visible for public viewing in the group, even though the group page might be visible for public viewing.

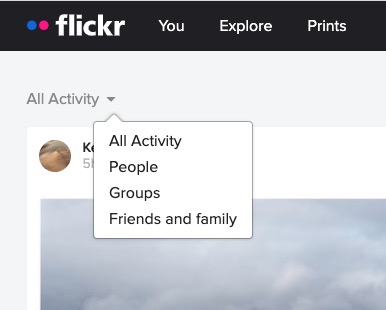
After uploading your photos they will (unless you’ve changed the default settings) appear by default in the Activity stream which you can access from the flickr logo …

… from which you will also be able to see the images of the people and groups you follow. This is the default view when you open Flickr on a mobile device.

Any photo you fave is then attached to your account so that you can return to view it on a later occasion.

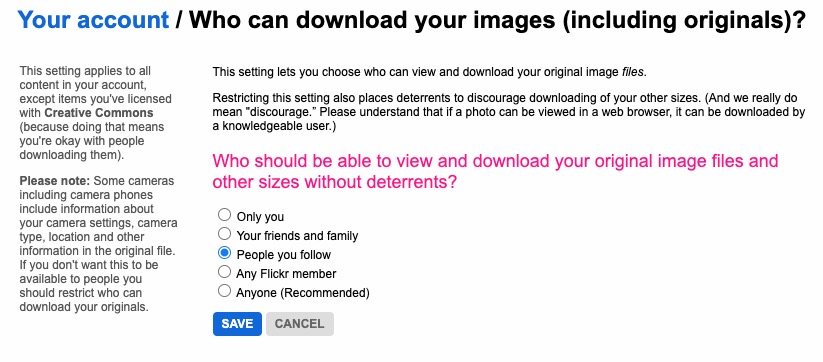
It is also possible – unless you’ve prevented it – for someone to download the photo, or add it to their own Photostream as their own! You might wish to check your settings to prevent that happening.

… and …

… so it’s important that you know what you’re doing when you follow someone – I certainly wouldn’t recommend the default setting of “Anyone”.

There are occasions however when you might wish to keep your photos completely private, or to share them privately within a Group. The settings in flickr to allow this are not exactly as intuitive as they might be so this post continues by seeking to help understand how you can “hide” your photos from the Public photostream, but to show them within a Group. Let’s start there.

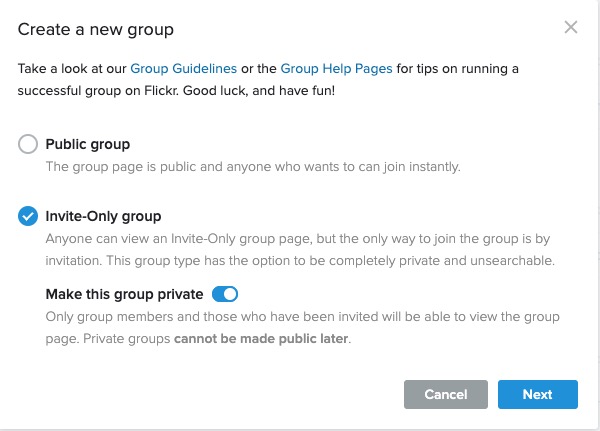
Groups can either be Public, open to invited membership (or upon application to join) and then also to be Private. Note especially carefully the note attached to Invite-Only Group which can be either Public or Private … “Anyone can view an Invite-Only group page …”

The last case is obviously the most restrictive and in this situation a Group is setup by a Flickr member and they invite either existing Flickr members, or non-members to join the group.

They will be sent an invite to join flickr, and the Group, as a member. You can therefore appreciate that you have to be a flickr member to view Photos which are in a Group. However if they’re not hidden from the Activity Stream by changing the default privacy settings (as above) and if it isn’t a Private group – they’ll still be visible to anyone unless you’ve also changed your search profile …

For the Invite-Only Group which has not been declared Private it is important to note that anyone (even non-Flickr members) can view the group page, so as we shall next, if you want your photos to be completely invisible to the outside world, you’ll have to do something else to make them invisible!!

If you want to keep your photos visible only to members of a Group, you need to specify on the Default privacy settings page either “Your friends”, or “Your family” depending upon the nature of the Group; similarly you should restrict Comments (and Notes, Tags and People) to “Your friends and family”.

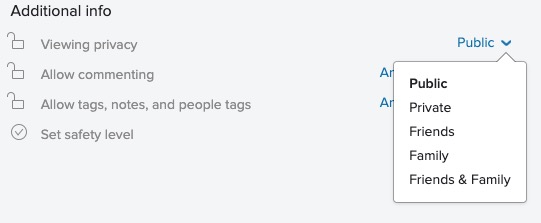
However these settings will then apply to every image that you upload and that might be more privacy than you really want, so you are able to choose the level of privacy on an image by image basis after you’ve uploaded them. This is done by looking at the information attached to an image after you’ve clicked on it in your Photostream …

… so, as an alternative, you could leave your Photostream relatively open using settings similar to the ones in the screenshots above and then restrict viewing of individual photos to Friends, or Family, etc. within Groups.

I hope this helps.

Decisions, decisions … Adobe Lightroom

A couple of U3A members have expressed an interest in purchasing Lightroom. It’s a confusing time in the Adobe world at the moment and the window for purchasing a stand-alone desktop version of the software (Version 6) is possibly closing, possibly … I don’t know!!

Adobe wants its users to move on to a Subscription-based Photography Plan which includes access and use of Photoshop as well as Lightroom, or alternatively a new Lightroom Creative Cloud Plan that is cloud-based with loads of cloud-storage and access to just Lightroom.

I decided to join the original plan about two years ago, and I hadn’t regretted it (until recently), but it does involve an ongoing commitment of c.£10.10 (currently) per month to allow you to keep editing your photos. If you cancel your subscription you can still access them, but the main editing functions are disabled. On the plus side you are provided with all the updates and new versions of the software whilst you still pay your subscription. As it was the main piece of photo software I used – it was a no-brainer for me back in 2015.
When I moved from Lightroom v.5 back in 2015, I opted for the Adobe Photography (20Gb) Plan Creative Cloud subscription. This is obtained from this link.

However beware. Adobe are pushing the cloud based service, rather than Lightroom as a desktop application, and are confusingly using the name of the old subscription Desktop application – Lightroom CC – to describe the mobile-world, cloud-based version which they are trying to push to the consumer market.

The desktop application is however ALSO part of the Photography Plan and IN MY HUMBLE OPINION this is the one you should be installing if you opt for the Photography Plan. It’s NOW called Lightroom Classic CC. This is the version that I upgraded to in the New Year – you could call it Lightroom 7.
However, as I said at the top of the message; if you just want a standalone, one-off purchase of Lightroom v.6 with a CD, it’s still available from Amazon for instance (also John Lewis, Curry’s and PC World I believe), or from Adobe direct.

Installing the standalone version from Adobe is relatively straightforward. You need to create an AdobeID as part of the process, and then you get a Licence Key. If you want to save c.£6  and NOT have the CD you can get it as a download to install the software – see the links from the Amazon page to get the “ xxx Activation code by email” version.

If you have an earlier version of Lightroom (e.g. v 4 & 5) you can upgrade it from this link and save yourself about 50% on the purchase price of Lightroom v.6, and if you’ve installed the Lightroom CC trial here’s a link if you want to change to Lightroom v.6

Now this is important. Lightroom v.6 will not be upgraded in the future. It is not straightforward to go back to Lightroom 6 from Lightroom Classic CC (v.7) without losing some of the information you’ve applied with that later version. However for the amateur photographer there is plenty in Lightroom 6 and unless you’re thinking of buying some very expensive camera bodies and lenses in the future you probably won’t suffer from just using Lightroom v.6.

Installation assistance for Lightroom 6 is provided here.
If you decide to go down the Creative Cloud subscription route (as I did initially), you should be careful during the installation process, and you may find it useful to follow the assistance provided in this link.

If you want to ask me any questions before making a decision, don’t hesitate to do so, it will be my pleasure to try and answer them. If I can’t answer the question I will point you to a link which I think will answer the question.

So what is my recommendation? This matter has taken up a lot of my time just recently and I’ve agonised over the decision I should make. You can read about my reasoning and the decision I eventually made to probably stay with Lightroom v.6 whilst trying out Lightroom Classic in this blogpost.